Last Updated on June 5, 2025 by ReTurf
Thinking About Artificial Turf vs. Concrete or Pavers? Here’s Just About Everything You Need to Know
If you’re staring out at a yard that’s more dirt patch than dream space—or maybe you’re just sick of mowing, watering, and edging every weekend—you’ve probably looked into options like artificial turf, pavers, or good ol’ concrete. Each one can totally change the look and feel of your outdoor space. But what’s actually best for your lifestyle, maintenance needs, and budget?
Let’s lay it all out. You deserve the full picture before you pull the trigger on anything permanent.
The Basics: What You’re Choosing Between
Before we get into the nitty-gritty, here’s a quick snapshot of what each option brings to the table:
- Artificial turf: Synthetic grass that looks and feels like real grass—minus the mud, bugs, or weekly upkeep.
- Concrete: The classic solid slab. Strong, durable, and utilitarian. Think patios, driveways, or pool decks.
- Pavers: Interlocking concrete, brick, or stone units arranged in patterns. Great for adding visual texture and a traditional, upscale look.
They’re all solid choices, but the real magic happens when you dig into how they perform long-term, how much maintenance they demand, and what kind of vibe they give your outdoor space.
Installation: What It Takes to Get Things Done
Comparing artificial turf vs concrete and/or pavers, the installation process can be the dealbreaker—or the deciding factor—for a lot of folks. Each one brings its own level of complexity, labor, and precision. Whether you’re hiring a crew or thinking about rolling up your sleeves to tackle it yourself, it helps to know what you’re really signing up for.
Artificial Turf
Though it can definitely be DIYed, especially for smaller projects, do-it-yourself turf installation is more involved than people tend to expect. While it may look simple, it’s not just a simple matter of unrolling some green stuff and laying it directly on the dirt. That said, when it’s installed properly—especially by a pro—it can last 15–20 years with minimal upkeep and a clean, finished look that stays put through every season.

1. Excavation:
The first step is digging down about 3–4 inches to remove existing grass, topsoil, roots, and anything else in the way. This creates space for the new sub-base that allows water to drain properly and prevents future settling.
DIY note: Renting a sod cutter or digging dirt by hand is doable but labor-intensive, especially in rocky or compacted soil.
2. Base Preparation:
Next comes the base layer—typically crushed stone, class II road base, or decomposed granite. This material is spread evenly across the excavated area and forms the foundation for everything else. Proper drainage is key here; the right base helps move water away and prevents pooling.
Professional tip: Contractors often use a laser level for precise grading, which can be tough to replicate with DIY tools.
3. Compacting and Grading:
The base is compacted using a plate compactor until it’s solid, flat, and properly graded for runoff. A slight slope is usually built in to prevent water from sitting. Skipping or rushing this step can lead to ripples, dips, or drainage issues later on.
4. Laying the Turf:
Once the base is ready, the turf is unrolled, shaped to fit the area, and seamed together with adhesive tape or turf staples. Edges are secured tightly to prevent lifting or shifting.
DIY risks: Seam lines and corners are where most amateur installs fall short. Uneven tension or poor cuts can make turf look obvious or wear out faster.

5. Infill Application:
A layer of infill—typically silica sand or antimicrobial-coated granules—is brushed into the turf. This helps the synthetic blades stand upright and adds weight to keep the turf grounded. Some infills also help with odor control or heat reduction, especially in high-traffic areas or pet zones.
Installation timeframe:
Residential installation may take about 2 to 5 days, depending on size and layout. DIY can stretch longer if equipment or materials aren’t on hand.
Concrete
Concrete is often seen as a quicker install, and in some ways it is—but it’s not without its own challenges. It’s strong and permanent, but also unforgiving if something goes wrong. Surface prep and weather timing are critical, and once it’s poured, there’s no turning back.
1. Forming and Base Prep:
The area is framed with wood forms to define the shape and depth. A compacted gravel base is typically added underneath for drainage and to reduce shifting or settling.
DIY warning: Getting the forms perfectly level and anchored can be harder than expected. A slight miscalculation can lead to an uneven slab or water pooling.
2. Pouring and Finishing:
Concrete is poured in one continuous motion, then screeded (leveled) and finished. Common finishes include smooth, broomed, or stamped textures. This step has a narrow window—too slow, and the surface starts to set; too fast, and it won’t finish evenly.
Professional edge: Contractors bring a full crew and years of experience to get the pour and finish right the first time. A rushed DIY job may show surface cracks, discoloration, or dips.
3. Curing Time:
Concrete takes time to fully set and gain strength. It’s usually safe to walk on after 48 hours, but heavy traffic, furniture, or vehicles should wait at least 7 days—and ideally 28 days for full curing.
Installation timeframe:
Active work takes 1 to 3 days, depending on weather and finish style. Add curing time on top of that.
Pavers

Pavers offer the most design flexibility but come with a high labor demand. Every piece is handled individually, and the base prep has to be just right—or problems will show up later in the form of shifting, settling, or weeds creeping through the joints.
1. Excavation and Base Installation:
The first step mirrors turf installation—removing 4–6 inches of soil and replacing it with a compacted base of crushed stone or gravel. This base has to be both level and permeable to prevent erosion or pooling.
2. Edge Restraints:
Once the base is set, edging restraints (plastic, metal, or concrete) are installed around the perimeter. These hold everything together over time and prevent the pavers from migrating outward under foot traffic or weather pressure.
DIY mistake alert: Skipping edge restraints or under-compacting the base is a common rookie error that leads to uneven pavers within a year or two.
3. Laying the Pavers:
Pavers are placed by hand in the desired pattern—whether it’s herringbone, basket weave, or a custom layout. Cuts are made with a masonry saw or paver splitter to fit curves or tight angles.
4. Joint Sand and Compaction:
After layout, joint sand is brushed into the gaps between pavers, and the entire surface is compacted again to lock everything in place. Polymeric sand can be used to harden the joints and prevent weed growth or erosion.
Installation timeframe:
Most paver projects take 3 to 7 days depending on the square footage, pattern complexity, and weather. DIYers can expect it to take longer, especially if cuts are involved or the area isn’t a simple rectangle.

The Bottom Line on Installation
- Artificial turf demands precision and drainage know-how, but pays off with years of low-maintenance use. It’s technically DIY-able, but seams, edges, and base grading are easy spots to get wrong—and they’re what people notice most.
- Concrete is quick to install but requires skill during pouring and finishing. It’s not forgiving if mistakes are made mid-pour, and repairs aren’t subtle.
- Pavers allow for creativity and repair flexibility, but they’re physically demanding, time-consuming, and sensitive to base prep. A well-laid paver surface is a thing of beauty; a poorly laid one is an ongoing headache.
In the long run, a professional installation doesn’t just save time—it often prevents costly fixes down the line. But if you’re determined and detail-oriented, DIY can be done right with the proper tools, prep, and patience. Just don’t skip the compacting stage—no matter what the project.
Maintenance: What You’ll Be Doing (Or Not Doing) Year After Year
Concrete
Concrete seems easy at first… until cracks show up.
- Power wash occasionally: For moss, dirt, or spills.
- Seal every few years: Helps protect against moisture, salt, and stains.
- Crack patching: Expansion and freeze-thaw cycles will almost always cause hairline cracks over time.
You’re not trimming it every week, but you are babysitting it more than folks expect.
Pavers
Pavers need a bit more TLC than concrete.
- Re-leveling: Freeze-thaw cycles or root growth can shift them.
- Weed growth: Grass loves the little joints if you’re not careful.
- Joint sand refresh: Needs refilling every few years.
They look sharp when fresh—but without regular upkeep, they start to look tired fast.
Artificial Turf
Here’s where turf shines. Maintenance is super minimal.
- Occasional rinsing: To clear dust, pollen, or pet waste.
- Brushing: Fluff up traffic areas once in a while.
- Weed control: Some may pop up around the edges, but weed problems with artificial turf are rare.
No mowing. No fertilizing. No irrigation. And it always looks like it’s just been cut.
Daily Living, Comfort, and Usability
Artificial Turf
It’s comfortable, soft underfoot, and stays green all year long. Kids can run barefoot, dogs love it, and it doesn’t bake your feet like concrete.
Turf also drains well if installed right. After a heavy rain, it dries quickly—no puddles, no mud.
Bonus: Newer infills can stay cool even in direct sunlight. No more scorched soles in July.
Concrete
Concrete gets hot. Real hot. And there’s no give underfoot.
It’s also louder when walked on, which might not seem like much until you’ve got a kid dragging a toy truck around at 7 a.m.
That said, it’s great for things like basketball hoops, grill setups, or outdoor kitchens. It’s rock solid—literally.
Pavers
Pavers strike a middle ground. They’re a little softer and cooler than concrete, and visually more interesting. You can create walkways, borders, and patios that really pop.
But over time, shifting can cause trip hazards—especially if you’ve got older folks or little kids using the space.
Visual Appeal and Design Flexibility

Artificial Turf
Modern turf looks nothing like that old green carpet you saw behind gas stations in the ’90s.
- Blended blade colors and textures
- Natural thatch for realism
- Cut and shaped however you want
It can make small yards feel bigger (and large yards feel like luxury resorts!) Pair it with stepping stones or a few planters, and you’ve got a designer look without hiring a landscaper every season.
Concrete
Poured concrete has a clean, minimal vibe. It’s best when you want a low-key, modern space—especially in gray tones or with exposed aggregate.
Stamped or stained options can mimic stone or tile, but they wear unevenly over time and can look dated if not maintained.
Pavers
Pavers win for that traditional, high-end aesthetic. Think cobblestone paths, herringbone patios, or mixed-material firepit zones.
But they can also look “busy” if overdone, and cheaper pavers don’t age well. It’s worth splurging if you go this route.
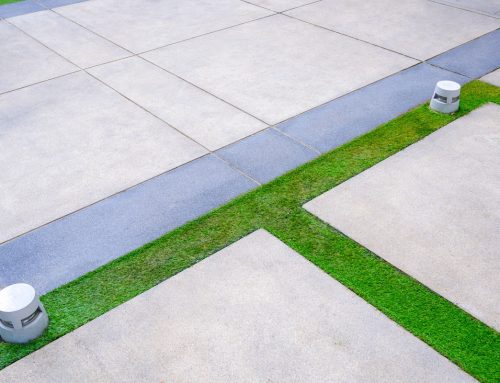
Thinking about mixing materials? Artificial turf pairs surprisingly well with stone or concrete pavers. In fact, one of the sharpest looks out there is laying pavers with artificial turf between them. It softens the hard lines of stone or concrete, gives you that modern, designer feel, and still holds up to foot traffic. You’ll see it a lot in courtyards, pool decks, or front walkways where people want a clean, high-end, but natural landscaping feel—without the hassle of mowing between stepping stones. Just keep in mind, the prep under both turf and pavers needs to be dialed in for drainage and levelness. This kind of install takes precision, so it’s usually worth having a pro handle it if you want it to look tight and stay that way. When done right, it’s one of the sharpest, lowest-maintenance yard designs out there.
Durability and Longevity
Artificial Turf
You’ll get 15–20 years out of good turf with barely any wear in most spots.
- UV-stable and won’t fade
- Resistant to digging and rough play
- No cracking, peeling, or breaking
Plus, even after a decade, it still looks neat—way better than patched concrete or sunken pavers.
Concrete
Concrete’s strength is also its weakness. It lasts 30+ years, but not without scars.
- Cracks are inevitable, even with joints and rebar
- Stains are permanent unless sealed quickly
- Repairs often look obvious
Once it starts breaking down, replacement is the only fix.
Pavers
Pavers can last 25–50 years if properly installed and maintained.
- Easily replaced one at a time
- Can shift or settle over time
- Susceptible to weed growth in joints
They’re durable but fussy. The longer they’re down, the more time they ask from you.
Environmental Impact & Drainage
Artificial Turf
- Saves thousands of gallons of water each year
- No fertilizer or pesticide runoff
- Permeable base allows stormwater drainage
There’s no getting around it—artificial turf is made from plastic. That’s one of the tradeoffs. While it does cut out years of watering, mowing, and chemical treatments, the material itself isn’t always easy on the planet once it’s worn out. Most standard turf isn’t recyclable, and old rolls often end up in landfills. That’s why newer artificial turf options made with recyclable materials are worth paying attention to—they solve that main environmental “knock” against synthetic grass.

Some of the newer turf options out there are starting to address that problem head-on. Instead of using mixed plastics that can’t be broken down easily, they’re made from a single, fully recyclable material like Olefin. That means once the turf finally reaches the end of its lifespan, it doesn’t have to end up in a landfill. It can be reused, repurposed, and turned back into something useful.
A good synthetic turf system can be a surprisingly green choice—especially if you’re thinking long-term.
Tip: Used artificial grass is also gaining traction as a greener option for synthetic turf lawns. Some companies take up old turf from sports fields or commercial installs, clean it, and repurpose it for residential use. Naturally, it’s not as pristine as brand-new turf, but for side yards, dog runs, or utility areas, it can be a smart, budget-friendly way to keep usable material out of the dump and give it a second shot at doing its job. Some of the more premium options even include used, high-grade sports turf without lines or other markings.
Concrete
- Totally impermeable surface—water runs off, not through
- Contributes to heat island effect in urban areas
- Requires heavy machinery and emits carbon during production
It’s not the greenest choice out there.
Pavers
- Semi-permeable if laid with permeable joints
- Better for drainage than concrete
- Still requires quarried stone or concrete production
Environmentally, pavers are the compromise option.
Cost Comparison: Upfront vs. Over Time
| Surface | Upfront Cost (per sq ft) | Maintenance Cost (10 yrs) | Total (10 yrs est.) |
| Artificial Turf | Medium | Low | Low |
| Concrete | Low | Medium | Low |
| Pavers | High | High | Medium |
Having artificial turf installed can feel expensive upfront, especially compared to concrete, but once it’s in, the cost curve flattens out in a big way. There’s no sealing, no patching, no pressure washing every season. If it’s installed right the first time, the upkeep is more like brushing and rinsing now and then than actual maintenance.

Concrete starts cheap but creeps up in cost with repairs and resealing. The low upfront price tag is part of why it’s so common for patios, driveways, and walkways. But those savings tend to even out over time. Between crack repairs, sealing, and occasional resurfacing, it can turn into a project every few years. Not necessarily bank-breaking, but something to stay on top of if you want it looking clean.
Pavers sit at the other end of the scale. They cost more from day one—both in materials and labor—and their maintenance adds up over time. From re-sanding joints and fixing shifted stones to pulling weeds that sneak through, pavers ask for attention. Some folks don’t mind the upkeep and love the classic look, but it’s worth knowing that they’re not a “set it and forget it” solution.
So while all 3 can serve their purpose depending on your priorities, artificial turf tends to win out when you look at the whole picture—especially for homeowners who want a yard that stays looking sharp without it becoming a “side job” for them to take care of.
When Turf Makes the Most Sense
Artificial turf isn’t the best fit for every single space. But it’s hands-down the winner when:
- You want a clean, low-maintenance lawn look year-round
- You’ve got kids or pets running around constantly
- You live in a spot where grass just won’t grow right
- You’re tired of being the lawn care crew every weekend
- You want something that looks polished and modern without constant upkeep
Final Thoughts

If you’re trying to create a backyard or front yard that stays beautiful with hardly any work, doesn’t bake your feet in the summer, and makes your neighbors do a double take, turf’s worth a serious look. There’s nothing wrong with concrete or pavers if they suit your space and you’re willing to keep up with the maintenance. But when it comes down to comfort, longevity, environmental impact, and sheer livability—artificial turf just keeps winning rounds.
Whatever you go with, make sure it fits the way you actually live. That’s the key to building a space you’ll enjoy—not just on day 1, but 10 years from now, too.