Last Updated on March 31, 2022 by ReTurf
When building a batting cage, indoors or out, the best practice surfaces keep balls clean and dry, and provide a consistent surface for hitters and throwers to train. This is why many turn to artificial turf for this application.
For outdoor cages, whether open to the elements with nets and chainlink or even walled and roofed, rainwater and drainage from other areas often create challenges in maintaining surface dryness. Well-designed and installed artificial turf systems allow frequent practice sessions without creating muddy surface conditions.
Artificial turf can be installed to minimize wear from spikes, cleats, and the heavy traffic confined to a small space. These surfaces also provide resistance to insects (biting bugs), and reduced exposure to allergens.
The Process
Installing artificial turf in a batting cage is much like installing field turf, just in a lot smaller of an area. In this, it makes for a doable DIY project but also reduced costs when a professional is hired.
*Save money: purchase quality used turf here.
-
The Foundation
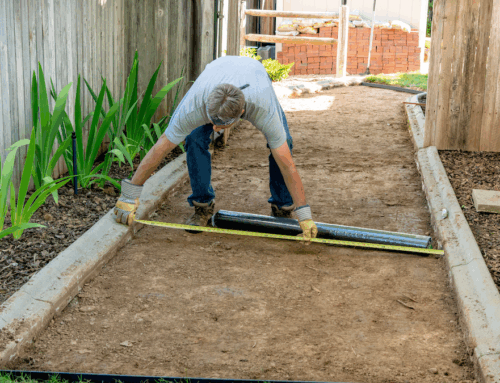
Starting with a level foundation is key. On natural ground, the process begins with sod and root removal. Once complete, you will want the area level, but a 1 to 2 degree slope in all directions from the center ( or from one side to the other ) will help expedite drainage from the turf surface.
In areas with heavy rains, drain inlets and/or pipes which collect and transmit water away from the batting cage area may be necessary. See: French Drain
Lastly, you will want to tamp, or compact, the surface into a solid initial ground foundation, maintaining ‘relative flatness’ or ‘planarity’ while following your intended slope.
-
The Base
There are two options for the base, compacted stone or concrete. Concrete will need to be professionally poured, but can then allow you to adhere the turf directly to that surface or attach on the edges. Concrete is recommended only where aggregate materials are likely to hold water or migrate during heavy rain events – or, when very thin non-infilled turf is used, and the adherence to concrete provides the necessary anchorage to keep the turf from excessive movement in wind, rain, or training exercises.
Compacted stone, ‘crusher-run’, ‘ABC stone’ ( aggregate base course ), or a ‘pug mix’ (crushed rock), is common when installing directly on the prepared earth foundation. This should be added and compacted in layers, until this base reaches a few inches above the surrounding ground. This elevation aids in draining the area, and offers the stability necessary.
It is often helpful to build a frame for the area, from pressure-treated lumber or other material such as railroad ties, concrete parking bumpers, or other re-purposed edging. The edging should be anchored into the soil so that it does not shift when placing the stone inside the frame.
The final layer, the top 1-2 inches, should be screenings, or fine stone. Sand may also be used, if it has enough fines to compact without shifting when water is applied, such as during rain ( test by flooding with a garden hose ). This is a powder-like limestone or granite that when placed over the base stone, allows for fine-raking of the surface, to create a level and smooth surface over which to install the turf.
-
Trim and Seam
Now that you have a solid base, the actual turf installation can take place,. Turf will need to be cut onsite to ensure everything fits properly in the area.
Pro tip: Flip turf edges over on the long sides of each piece, so that the fibers are upside-down, and trim the turf between the tuft rows – the rows of fiber tufted into the backing. Done on each piece, this will create straight edges from one piece to each adjacent piece. This can be done with a box cutter, cutting from the backside of the turf.
If you need to adjoin pieces of turf within your batting cage, you will need to seam the edges together. This step involves seam tape, turf adhesive, and can be aided by the use of a glue box.
Learn more about those items here: Supplies
For the outside edge of the turf, regular garden stakes can be used to staple it down to the base, or if a frame has been built from lumber, the turf may be nailed or stapled to the lumber, and then backfill placed against the frame to finish the project after the infilling step.
-
Infill
Lastly, applying infill will allow the turf to have more shock absorption properties, batter comfort, and keep the synthetic blades erect – creating a more natural surface. The infill can be spread using a spreader or slung out with shovels, and then brushed in with a turf brush, leaf rakes, and/or lightly blown in with a leaf blower.
The key to the infill process, is to apply the infill evenly. This can be done by dividing the turf area into ‘zones’, and placing an equal amount of infill in each zone.
PRO Tip:
Take a grain shovel full of infill or a 5-gallon bucket full, and place it roughly 2’ off of both edges in one corner. Then, take another shovel of material, and standing next to the first pile of material, take one stride along either side and place the shovel full of material. Repeat placing piles one stride apart in two directions until the entire surface has a uniform placement of infill piles.
Using a leaf rake, lift the turf fibers so that the infill falls between, making sure that no fibers are ‘trapped’ under infill. A picking motion is best, rather than a sweeping motion as used in raking leaves. To pick the fibers and allow the infill to fall between is best, and then a more traditional sweeping motion may be employed after the fibers are all standing up without being trapped.
Once all infill is deployed and raked-in, use a leaf blower to smooth out the infill surface, distributing all infill evenly using air and a sweeping motion of the air tube, so as to not displace too much material in one spot…we call this ‘air-brushing’ the surface. It will expose trash for removal, while allowing an even distribution of infill.
Check out this video of the installation process: